Chapter 4 Basic reactivity
4.1 Introduction
In the the last chapter, we talked about creating user interfaces. Now we’ll move on to discuss the server side of Shiny, where you use R code at runtime to make your user interface come to life!
In Shiny, you express your server logic using reactive programming. Reactive programming is an elegant and powerful programming paradigm, but it can be disorienting at first because it’s a very different paradigm to writing a script. The key idea of reactive programming is to specify a graph of dependencies so that when an input changes, all outputs are automatically updated. This makes the flow of an app considerably simpler, but it takes a while to get your head around how it all fits together.
This chapter will provide a gentle walkthrough of reactive programming, introducing some of the most basic reactive constructs you’ll use in your Shiny apps. We’ll start with a survey of the server function, discussing in more detail how the input and output arguments work. Next we’ll review the simplest form of reactivity (where inputs are directly connected to outputs), and then discuss how reactive expressions allow you to eliminate duplicated work. We’ll finish by reviewing some common roadblocks encountered by newer shiny users.
library(shiny)4.2 The server function
The typical Shiny app boilerplate looks like this:
library(shiny)

ui <- fluidPage(
  # UI goes here
)

server <- function(input, output, session) {
  # Server logic goes here
}

shinyApp(ui, server)
As you can see, the server function is a function that you (the app author) define, and pass to Shiny via the shinyApp function. You’ll never invoke a server function yourself; rather, Shiny invokes it whenever a new session begins. A session begins each time the Shiny app is loaded by a browser, either by different people, or by the same person opening multiple tabs.
Almost of the reactive programming you’ll do in Shiny will be directly in the server function3. The server function is so important because it encapsulates the connection to a single browser session, creating a private scope for that particular session. In other words, every variable you create in the body of the server function is only accessible to a particular session. Most of the time, we’ll also want our reactive interactions to be private to each session too: when user A moves a slider, you usually want outputs to update ony for user A, not user B. Therefore, we’ll write our reactive logic in the server function.
You might have wondered it’s safe for two users to connect to a single Shiny app at the same time: how does Shiny keep track of whose inputs and outputs are whose? This happens automatically because shiny calls your server function once for each person, and because each call to an R function is independent, there’s no way for the variables to get muddled up.
4.2.1 Server function parameters
Server functions always take three parameters: input, output, and session4. You’ll never create these objects yourself; rather, they are created by Shiny when a session begins. Each combination of input, output, and session connects back to a specific session, and we’ll use these objects to communicate back and forth with the browser.
For the moment, we’ll focus on input and output, and leave session for later chapters.
4.2.2 Input
The input object is a list-like object that contains all the input data sent from the browser, stored by input ID. If your UI contains a numeric input control with an input ID of count:
numericInput("count", label = "Number of values", value = 100)then input$count will initially contain the value 100. As the user changes the value in the browser, input$count will be updated automatically by Shiny.
Unlike a typical R list, input objects are read-only. The following line will not work:
# Throws an error
input$count <- 10
The reason for this restriction is that input is reflects what’s happening in the browser; the browser is the “single source of truth”. Being able to directly modify the input object would introduce a second source of truth, which could then be in conflict with the state of the browser.
One more important thing about input is that it’s a bit selective about who is allowed to read it. You must be in a reactive context to be able to access it. We’ll come back to that idea very shortly, but it’s a fundamentally idea that allows outputs to automatically update when an input changes. For example, this server function will throw an error:
ui <- fluidPage(
  numericInput("count", label = "Number of values", value = 100)
)

server <- function(input, output, session) {
  message("The value of input$count is ", input$count)
}

shinyApp(ui, server)
#> Error: Operation not allowed without an active reactive context.
#> (You tried to do something that can only be done from inside
#> a reactive expression or observer.
To new Shiny app authors, this is an extremely surprising limitation! But rest assured that input’s selectivity is a feature, not a bug. To explain why, we’ll first need to talk about outputs.
4.2.3 Output
Shiny UIs not only contain inputs, but also outputs. The various *Output UI functions—plotOutput(), tableOutput(), verbatimTextOutput(), and friends—merely insert empty boxes, or placeholders, into your UI. The output object is how you tell Shiny how to populate these empty boxes.
You use the output object by wrapping a code block with a render function, then assigning all of that to a slot on the output object. Like this:
server <- function(input, output, session) {
  output$hist_plot <- renderPlot({
    # Choose 100 random values from a normal distribution,
    # and create a histogram
    hist(rnorm(100))
  })
}
This snippet assumes that the UI contains a plotOutput("hist_plot"). The render function you use (renderPlot) must match with the output function (plotOutput), and the output slot (hist_plot) must match with the output ID.
(Note that the ID is quoted in the UI, but not in the server.)
4.2.4 Imperative vs. declarative
You might read this code and think it means, “Render the plot hist(rnorm(100L)), and fill plotOutput("hist_plot") with it.” But this intuition is wrong, in a subtle but important way. This code does not instruct Shiny to render the plot and send it to the browser, but instead, tells Shiny how it could render the plot, if and when Shiny wanted to. This is the difference between imperative programming, which is what you’re probably used to, and declarative programming, which is what Shiny uses.
Imperative programming is about issuing specific commands, to be carried out immediately. Declarative programming is about expressing some higher-level goals or constraints, and relying on someone else (in this case, Shiny) to decide how and/or when to translate that into action.
Imperative says: “Go make me a sandwich.”
Declarative says: “Ensure there is a sandwich in the refrigerator at all times.” (Sorry, sometimes Declarative can be a demanding jerk.)
You may actually be more familiar with declarative programming than you think. SQL and regular expressions are examples of declarative programming. Excel formulas are too.
The correct, declarative reading of the code snippet above is “Whenever you want to render the hist output, be sure to do it as a plot, and the logic for doing so is hist(rnorm(100L)).” It’s totally up to Shiny whether and when to actually render the plot; maybe right away, maybe quite a bit later, maybe many times, maybe never. This isn’t to imply that Shiny is capricious and arbitrary, only that it’s Shiny’s responsibility, not yours, to decide when render logic is actually executed.
4.3 Using inputs and outputs together
The above rendering logic, hist(rnorm(100)), isn’t very exciting; the user can’t interact with this app in any way (unless you count reloading the browser, which would generate a new batch of values). Let’s modify the output to use the input. The complete app is below:
library(shiny)

ui <- fluidPage(
  numericInput("count", label = "Number of values", value = 100),
  plotOutput("hist_plot")
)

server <- function(input, output, session) {
  output$hist_plot <- renderPlot({
    # Choose input$count random values from a normal distribution,
    # and create a histogram
    hist(rnorm(input$count))
  })
}

shinyApp(ui, server)
Run this app, and you’ll notice that as you change the count input, the output updates immediately. This is reactive programming at work! When one thing (input$count) changes, other things (output$hist_plot) automatically and immediately respond.
Let’s see what happens if we add a few more inputs and outputs. In this next example, we’ve added a new input that affects the histogram: input$bins is used to specify the number of bins in the histogram. We’ve also added a table output, that limits itself to displaying the first input$rows of the data.
library(shiny)

ui <- fluidPage(
  numericInput("count", label = "Number of values", value = 100),
  numericInput("bins", label = "Bins", value = 10),
  plotOutput("hist_plot"),
  numericInput("rows", label = "Rows to show", 10),
  tableOutput("value_table")
)

server <- function(input, output, session) {
  output$hist_plot <- renderPlot({
    # Choose input$count random values from a normal distribution,
    # and create a histogram
    values <- rnorm(input$count)
    hist(values, breaks = input$bins)
  })

  output$value_table <- renderTable({
    # Choose input$count random values from a normal distribution,
    # and display the first input$rows
    values <- rnorm(input$count)
    data.frame(head(values, input$rows))
  }, colnames = FALSE)
}

shinyApp(ui, server)
By careful inspection of the code, we can see that input$count affects both outputs, while input$bins affects only the plot and input$rows affects only the table. Run the app, and you’ll see that Shiny knows this too. If you change input$bins, the plot is affected but the table is not. If you change input$rows, the table is affected but the plot is not.
As your shiny apps get more complex, you’ll find that carefully drawing out the graph of reactive inputs and outputs helps you to understand what’s going on. The following diagram introduces you to the basic conventions we’ll use throughout this book.
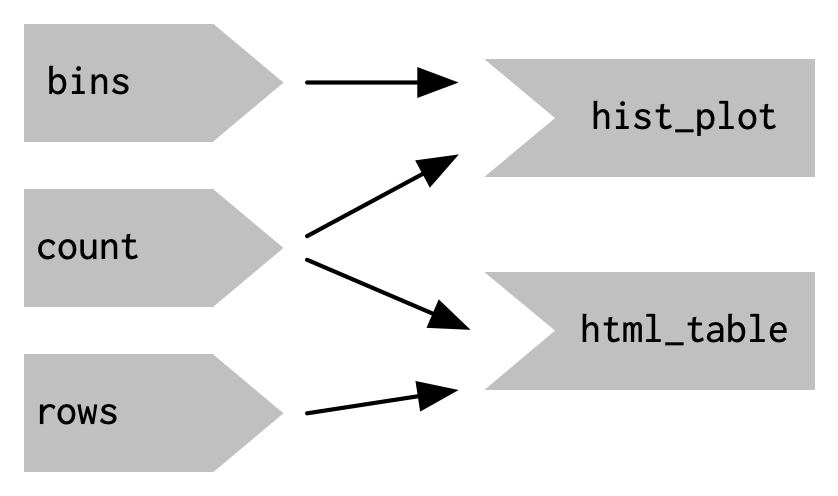
The point of this example is to demonstrate that Shiny doesn’t simply re-render all of its outputs whenever an input has changed. Somehow, without a lot of help from us, Shiny figures out which inputs should affect which outputs. This is the most “magical” aspect of reactive programming, and we’ll eventually pull back the curtain; for now, just trust that it works.
4.3.1 Outputs are atomic
Shiny is smart enough to discern that an output needs to be updated. However, it’s not nearly smart enough to know if it can get away with running only part of the output’s code block. For example, the code for hist_plot has two lines:
values <- rnorm(input$count)
hist(values, breaks = input$bins)
As a human looking at this code, you might conclude that when input$bins changes, it’s not necessary to re-run both lines; if we still had access to the existing values variable, merely running the second line might be enough.
Shiny doesn’t try to be this clever. Instead, an output’s render code block is always executed in its entirety, whether it’s two lines of code or two hundred. In this way, each output represents an indivisible unit.
4.3.2 Side effects
4.3.3 Reactive expressions
If you read the code above carefully you might have noticed that we’re actually generating the random numbers in two different places. The table and the histogram are actually displaying the results from two unrelated datasets! To fix that problem we need to introduce one more big idea: the reactive expression.
A reactive expression is created using reactive(). It ordinary R code, and makes it reactive so that it automatically updates when it’s inputs change. To use a reactive input, you call it like a function.
server <- function(input, output, session) {
values <- reactive({
rnorm(input$count)
})
output$hist_plot <- renderPlot({
hist(values(), breaks = input$bins)
})
output$value_table <- renderTable({
data.frame(head(values(), input$rows))
})
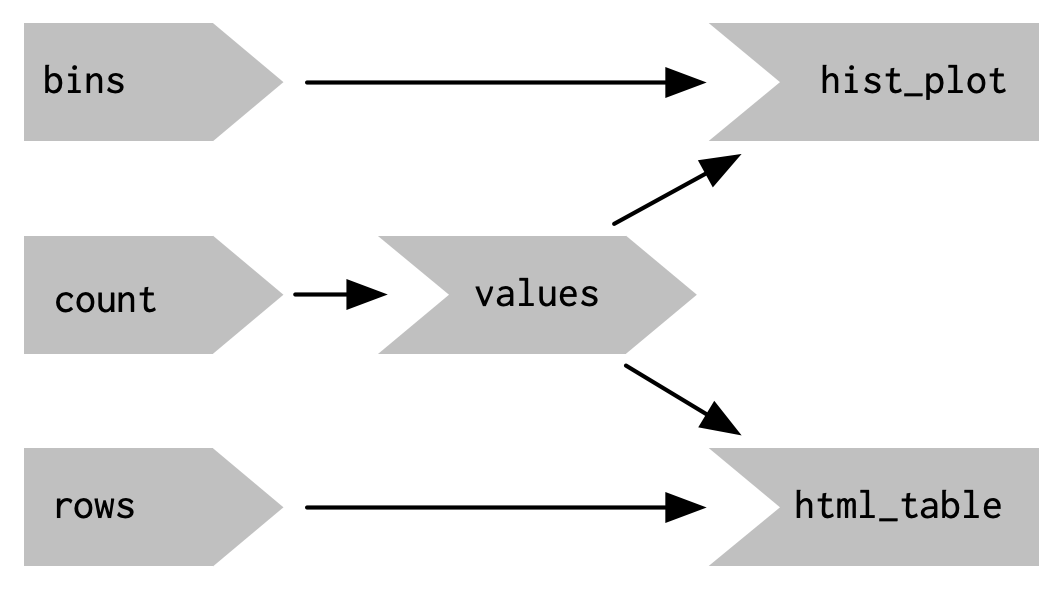
}This leads to the following reactivity diagram. You can see that we’re starting to develop a more complex graph. We’ll come back to exactly how events flow through this graph, and how Shiny ensures that it does the smallest amount of work in Chapter 6.
Reactive expressions are extremely important for creating efficient shiny apps because they are only updated when their inputs change. This means that you can use them to encapsulate expensive operations so that they are only re-computed the minimal number of times. If you have every used a tool like make, this might seem familiar.
But often in reactive programming, neither of these choices satisfy. Using a variable won’t work:
# Don't do this!
server <- function(input, output, session) {
  dataset <- get(input$dataset, "package:datasets", inherits = FALSE)

  output$summary <- renderPrint({
    summary(dataset)
  })

  output$table <- renderTable({
    dataset
  })
}
In this code, we’re attempting to calculate the value of dataset just once, as the session starts. But the value of input$dataset may change over time. We noted a few paragraphs ago that Shiny outputs are reactive (they re-execute as necessary); the same cannot be said for free-floating code like this. So the result of extracting a variable like this is tha the dataset variable will assume some value at startup based on the initial value of input$dataset, and stay at that value forever. This is clearly not what we want, and is such an easy trap to fall into that in fact Shiny detects this condition and throws an error immediately.
If using a variable won’t work, how about a function? This will work, and takes care of the code duplication, but it does result in duplicated effort:
# Don't do this!
server <- function(input, output, session) {
  getDataset <- function() {
    get(input$dataset, "package:datasets", inherits = FALSE)
  }

  output$summary <- renderPrint({
    summary(getDataset())
  })

  output$table <- renderTable({
    getDataset()
  })
}
We get the correct behavior this time, at least—we’re calling getDataset() from within our output code, so Shiny will know to recalculate the outputs when input$dataset changes. However, for each change to input$dataset, getDataset is going to be called twice, and its work is therefore going to be performed twice. (In this example, the work being done in getDataset is totally trivial so it doesn’t actually matter; just imagine we’re doing a more expensive operation like retrieving a dataset from a web service or database, or fitting a model over a large dataset, or performing simulations.)
To summarize: while variables calculate the value only once (not often enough), and functions calculate the value every time they’re called (too often), reactive expressions calculate the value only when it might have changed (just right!).
4.4 Controlling effect flow
Buttons and observers.
4.5 Reactivity roadblocks
The primary exception is where there’s some work that can shared across multiple users. For example, all users might be looking at the same large csv file, so you might as well load it once and share it between users. We’ll come back to that idea in Chapter XYZ.↩
For legacy reasons,
sessionis optional, but you should always include it.↩